46. User Management - Creation, Modification and Deletion
Contents
To make it easier to manage users, linux provides some common commands that allow you to add, delete, and modify users in a more standardized way.
Add User
With the useradd command, we can create new users.
The following are the relevant files or directories that will be involved when creating a user:
| Name | Type | Purpose | Preview |
|---|---|---|---|
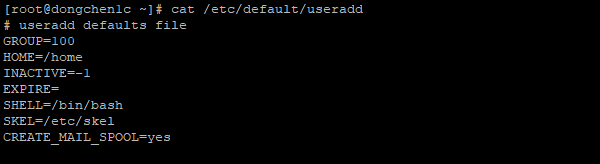
| /etc/default/useradd | File | Default variables’ setting file for the useradd command. |
|
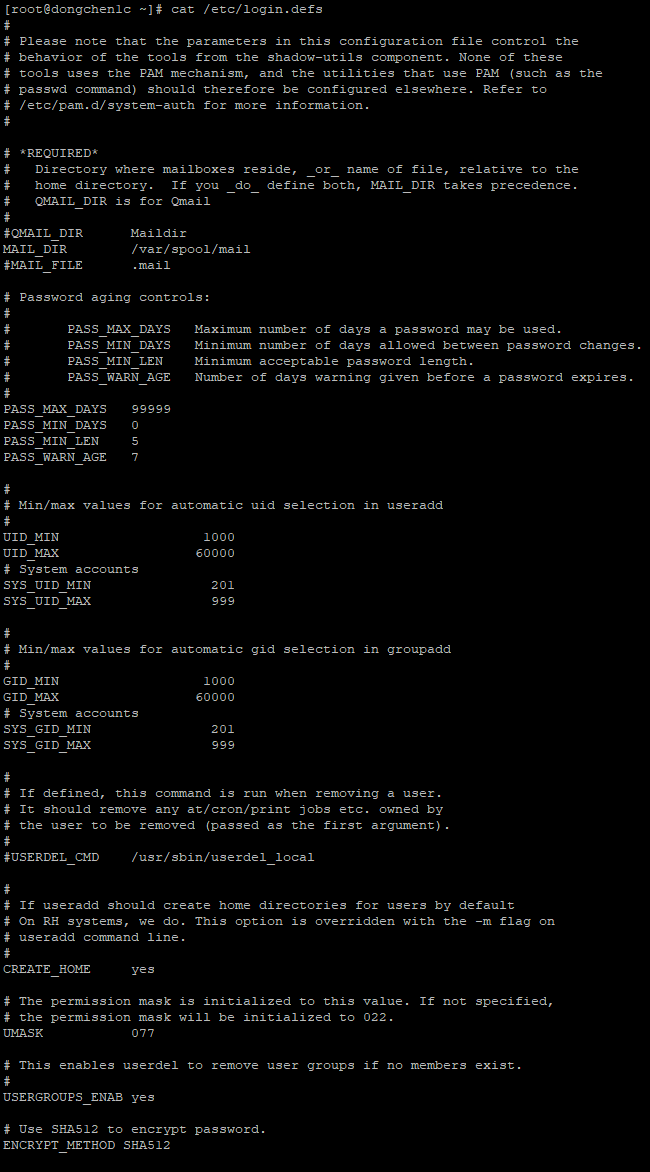
| /etc/login.defs | File | Default variables’ setting file for the useradd command options. |
|
| /etc/shells | File | Available shells for new users. |

|
| /etc/skel/ | Directory | Initialization profiles for new users. |

|
Here are some common options for useradd command:
| Option | Meaning |
|---|---|
| -b or ‑‑base-dir | Specify the user home’s base directory, use the value of the HOME variable in /etc/default/useradd if this is not specified. |
| -c or ‑‑comment | Specify the user’s comment, commonly used to hold the full name of the user. |
| -d or ‑‑home-dir | Specify the user’s home directory. The user home’s directory will be the value of the HOME variable in the /etc/default/useradd configuration file plus the user’s login name if this is not specified. |
| -g or ‑‑gid | Specify the user’s group. When this is not specified: if the value of the USERGROUPS_ENAB in the /etc/login.defs file is yes, then the user’s login name is used as the group name to create a group, or else if the value is no, then use the value of the GROUP variable in the / etc/default/useradd configuration file as the user’s group ID. |
| -G or ‑‑groups | Specify the user’s supplementary groups. |
| -k or ‑‑skel | Specify a path that contains files and directories to copy to user’s home directory. If this option is not specified, the value of the SKEL variable in the /etc/default/useradd configuration file or the /etc/skel directory will be used as the path. |
| -m or ‑‑create-home | Create the user’s home directory if it doesn’t exist. If this option is not specified and the value of the CREATE_HOME variable in the /etc/login.defs configuration file is not set to yes, then the home directory will not be created. |
| -M or ‑‑no-create-home | Don’t create the user’s home directory, this ignores the value of CREATE_HOME variable in the /etc/login.defs |
| -r or ‑‑system | If this option is specified, the created user is a system user. The system user’s id range is between the values of the SYS_UID_MIN and SYS_UID_MAX variables in the /etc/login.defs configuration file. Home directories are not created by default for system users, and you can create home directories by specifying the -m option. The system user is a non-login user, so it does not have login information. |
| -s or ‑‑shell | Specify the user’s login shell. If this option is not specified or the value passed to this option is empty, the user uses the system default login shell. |
| -u or ‑‑uid | Specify the user’s ID. The specified value must be greater than or equal to the value of the UID_MIN variable in the /etc/login.defs configuration file and less than or equal to the value of the UID_MAX variable in the same file. |
The ID of the new user created by default by the useradd command is the value of the last user ID plus 1, followed by the creation of a group with the same name as the user:
|
|
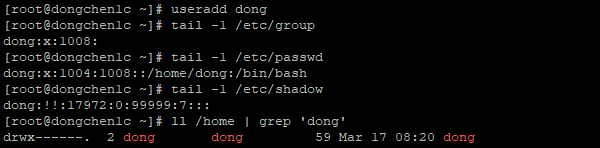
Output the last created user's details in the group, passwd and shadow files
Specify User Comment (Full Name)
With the -c option, we can specify comment for the user:
|
|
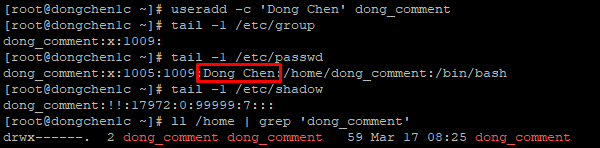
Output the last created custom comment user's details in the group, passwd and shadow files
Specify Home Directory
With the -d option, we can specify the user’s home directory:
|
|
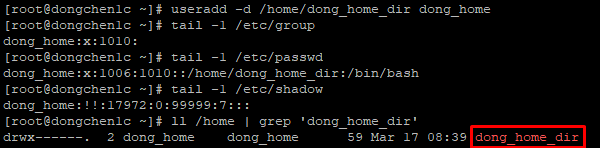
Output the last created custom home directory user's details in the group, passwd and shadow files. The user's directory is different with the login name
Specify Group
With the -g option, we can specify the user’s group:
|
|
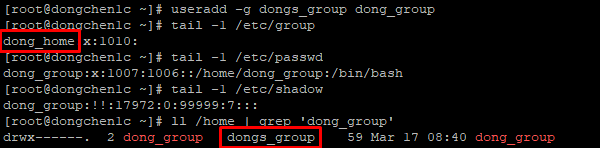
Output the last created custom group user's details in the group, passwd and shadow files. The user is assigned to an existing group, so no new group created
Specify User ID
With the -u option, we can specify the user’s ID:
|
|
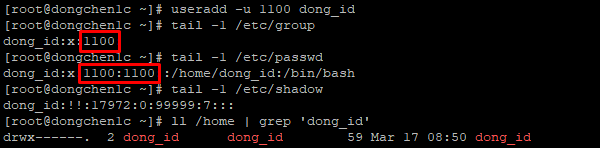
Output the last created custom ID user's details in the group, passwd and shadow files. The user's ID and group ID are both 1100
Create System User
With the -r option, we can create a system user:
|
|
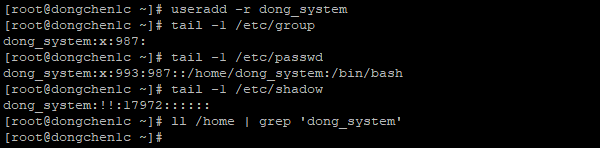
Output the last created system user's details in the group, passwd and shadow files. The user doesn't have home directory and login capability
Modify User
We can change the user’s information through the usermod command.
Here are some common options for usermod command:
| Option | Meaning |
|---|---|
| -a or ‑‑append | Used in conjunction with the -G option, if used, retains the user’s previous supplementary groups. |
| -c or ‑‑comment | Specify the user’s new comment, that is, the full name of the user. |
| -d or ‑‑home | Specify the user’s new home directory. |
| -e or ‑‑expiredate | Specify the user’s expiration date. Commonly used to specify a value of 1 to disable a user. |
| -g or ‑‑gid | Specify the user’s new group, which replaces the previous user group’s ownership of all files in the user’s home directory. |
| -G or ‑‑groups | Specify the user’s new supplementary groups. Adding the -a option preserves the previous supplementary groups. |
| -l or ‑‑login | Specify the user’s new login name. |
| -L or ‑‑lock | Lock the specified user. |
| -m or ‑‑move-home | Move the contents of the previous home directory to the new home directory; this option can only be used with the -d option. |
| -s or ‑‑shell | Specify the user’s new login shell. If the value passed to this option is empty, the user uses the system default login shell. |
| -u or ‑‑uid | Specify the user’s new ID. |
| -U or ‑‑unlock | Unlock the specified user. |
Append Supplementary Groups
With the combination of -a and -G options, we can append more supplementary groups to the user:
|
|

Output the user's id and group ids before and after the supplementary group appendant
Delete User
We can delete users through the userdel command.
Here are some common options for userdel command:
| Option | Meaning |
|---|---|
| -r or ‑‑remove | If this option is not specified, the user’s home directory and mail spool directory are not deleted. |
Delete Users Without Deleting Related Directories
By default, the userdel command preserves home and mailbox directories when deleting a user:
|
|
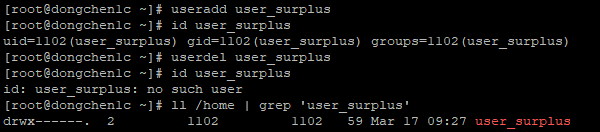
Output the user's id and group ids before and after the deletion of the newly created user. The deleted user's home directory is retained
Delete Users With Related Directories
With the -r option, the user’s home directory and mailbox directory are also deleted:
|
|
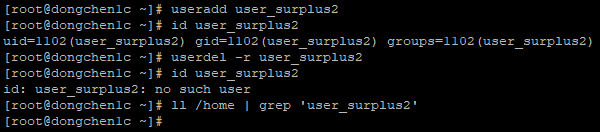
Output the user's id and group ids before and after the deletion of the newly created user. The user's home directory is also deleted
Password File Integrity Verification
We can use pwck command to check the integrity of user accounts:
|
|

Output the result of the password files integrity verification
User Password
We can use the passwd command to specify or change the user’s login password.
Here are some common options for passwd command:
| Option | Meaning |
|---|---|
| ‑‑stdin | Get the new password from the standard IO input. |
| -d or ‑‑delete | Delete the user’s password. |
| -e or ‑‑expire | Expire the user’s password. The next time the user logs in, a new password needs to be specified. |
| -l or ‑‑lock | Lock the user’s password. This is not valid for logging in via SSH Key. |
| -u or ‑‑unlock | Unlock the user’s password. |
Set User Password Through IO Input
With the ‑‑stdin option, the passwd command gets the data from the IO input as the password:
|
|

Output the shadow file before and after the user's password modification
Users Passwords
We can use the chpasswd command to specify or change the users’ login passwords.
Here are some common options for chpasswd command:
| Option | Meaning |
|---|---|
| -c or ‑‑crypt-method | Use a method to encrypt the password. Algorithms such as DES, MD5, NONE, SHA256, SHA512 can be used, if they exist in libc. |
| -s or ‑‑sha-rounds | By default, the system uses 5000 rounds to encrypt the password. We can specify a value between 1000 and 999999999. |
Set Users Passwords Through IO Input
Let’s first remove dong’s password:
|
|

Dong's password has been removed
We use the chpasswd command to bulk change the users’ passwords:
|
|

Assign passwords to dong and dongchen individually
Change Shell
We can use the chsh command to change the user’s login shell.
Here are some common options for chsh command:
| Option | Meaning |
|---|---|
| -l or ‑‑list-shells | Output the list of the shells listed in /etc/shells file |
| -s or ‑‑shell | Specify the user’s login shell. |
Check for Available Shells
With the -l option, we can view the available login shells:
|
|

Output available login shells
Change to New Shell
With the -s option, we can assign a login shell to the user:
|
|
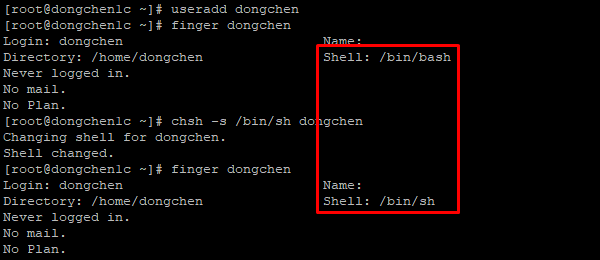
Output the newly created user's details before and after the login shell modification
Change Finger
With the chfn command, we can change user details.
Here are some common options for chfn command:
| Option | Meaning |
|---|---|
| -f or ‑‑full-name | Specify the user’s full name. |
| -o or ‑‑office | Specify the user’s office room number. |
| -p or ‑‑office-phone | Specify the user’s office phone number. |
| -h or ‑‑home-phone | Specify the user’s home phone number. |
Change User Details
With the -f option, we can change the user’s basic information:
|
|

Output the user's details before and after the user details modification
Change Age
With the chage command, we can change user password expiration information.
Here are some common options for chage command:
| Option | Meaning |
|---|---|
| -d or ‑‑lastday | Specifies the date on which the password was last modified. |
| -E or ‑‑expiredate | Specifies the expiration date of the password. |
| -I or ‑‑inactive | Specifies the number of days that you can log in after the password expires. |
| -l or ‑‑list | Output the user account’s aging information. |
| -m or ‑‑mindays | Specifies the minimum number of days that can be used after password modification. |
| -M or ‑‑maxdays | Specifies the maximum number of days that can be used after password modification. |
| -W or ‑‑warndays | Specifies the number of days to alert the user if the password needs to be modified. |
Output User Account Aging Information
With the -l option, we can view the aging information for the user’s account:
|
|
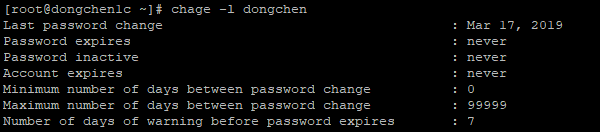
Output the user account's aging information
References USERADD(8), USERMOD(8), USERDEL(8), PWCK(8), PASSWD(1), CHPASSWD(8), CHSH(1), CHFN(1), CHAGE(1)
Author Dong Chen
LastMod Mon Mar 18 2019